Step 1: “Pick up”
From the lowly cell phone camera to the high-end DSLR and even medium format cameras, the market for photography equipment is more accessible than ever. Unfortunately, deciding on one camera to buy is more difficult than ever. Each camera type has its advantages and disadvantages. Here's the key: know the characteristics of each type and then compare the pros and cons while considering the types of photography you will shoot. Weigh convenience over features you actually need.
For example, if you photograph a family and mom wants a nice 16 x 20 photo to go over the fireplace, your camera needs a minimum 12.8 megapixel sensor. For travel, a smaller more convenient point-and-shoot, a mirrorless, or a cell phone camera might be in order.
- Here’s the math: Because the viewing distance is increased for larger prints, they actually require fewer pixels per inches than smaller ones. That means a 5x7 print would typically be 300 ppi where a 16x20 can look great at 200 ppi. The math looks like this: 16x200 X 20x200 = 12,800,000 pixels or a 12.8 megapixel photo. If the photo is un-cropped that can also be the size of the sensor. If you crop you will need a larger sensor size. Note: This math does not take into account those of you who like to view photos within an inch away from leaving a greasy nose oil picture-ruining streak. For you no sensor will ever be big enough.
To photograph your niece's soccer game you'll need a camera with quick focus on fast moving players, a good range of long focal lengths to get visually closer to the action, and a fast motor drive to capture the fast pace of the game. In other words, a DSLR.
Step 2: “Point”
Do you ever pick up your camera in an uninteresting place? If not, have you ever considered it may not be the place that's boring? Pickup your camera anyway. In response to a specific event, I will have my camera at the ready. I might be moving toward it or it to me, either way, I start anticipating a photographic moment. Even just sitting around things can change from nothing to something realigning my attitude and attention.
Step 3: “Elements”
Photography’s selection process begins within the frame of the viewfinder. I take that back, interest in the scene is the first step. Then, comes in-camera cropping, the process of visually eliminating extraneous or distracting elements from behind the viewfinder. Remove things that may hold a viewer’s eye too long and distract from attention due the subject; such as the bunch of helium balloons floating behind the birthday girl's head or the referee running back and forth through the foreground of an action shot.
Elements can also refer to graphic elements like lines, curves, shapes, and vectors in your photo to function like a road map for the eye. Composition is visually organizing these elements and determining if a photo should be static or dynamic. No matter the visual energy in a photo, composition should always complement the subject.
Light shapes, defines, and adds emotion to our subjects. Brightness can emphasize and darkness can minimize attention we give elements in the frame. Light reveals texture and can reduce or expand the look of depth.
The element of lighting is the sine qua non (the essential thing) of photography. Without it taking pictures would be the least of our worries. Light shapes, defines, and adds emotion to our subjects. Brightness can emphasize and darkness can minimize attention we give elements in the frame. Light reveals texture and can reduce or expand the look of depth. (Much more on this in coming issues.)
Step 4: “Perspective”
The simplest aspect of perspective is camera position. In a three-dimensional world position can be high or low or to the right or left; or, it can be closer to the subject or farther away. Your choice of camera position can alter object relationshipse which may in turn alter a photo’s meaning.
A zoom lens' focal length (from wide-angle, to telephoto) relatively expands or compacts the perspective of your photo. In everyday use, wide-angle lenses are often used for landscapes and moderate telephotos for portraits.
Often overlooked, storytelling is an important component to perspective. The ease of modern photography has reduced a camera's storytelling power to that of a mere visual stenographer, “I was here and this happened.” Let your pictures tell an emotional or conceptual story.
Don’t limit yourself to a single photo. Start with a diptych then work your way up to a triptych . Then move to multiple photos, much like a photo book or slide show. It’s not only powerful, it better engages your audience.

Step 5: “Settings”
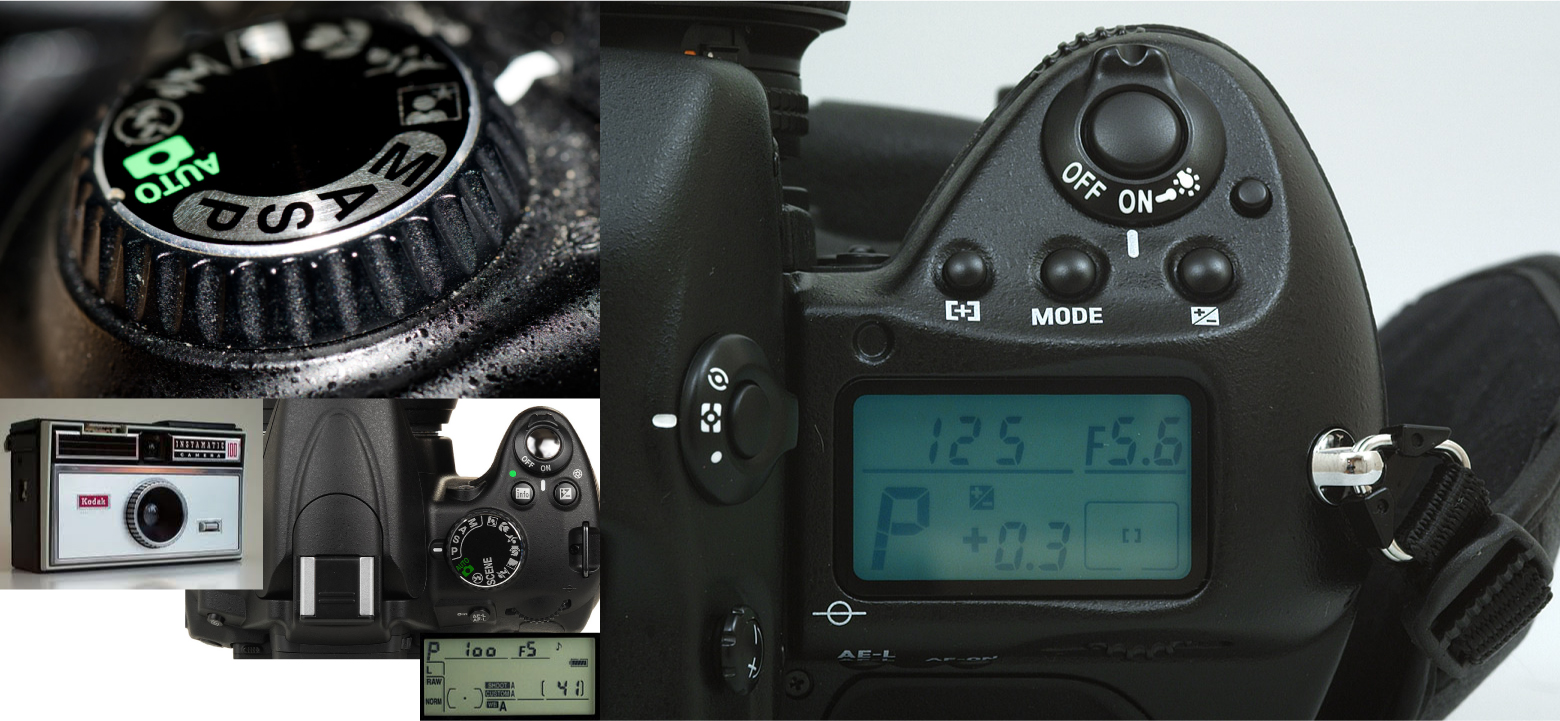
Ah exposure, the bane of the newbie photographer. Photos too light or too dark are trashed while content is ignored. Clearing that first hurdle of taking a properly exposed photo provides the energy necessary to clear the second, content.
Camera manufacturers' attempts at making cameras more accessible have actually made them harder to use. Learn the tripod of exposure–shutter, aperture, and ISO in place of the laundry list of new-fangled presets.
It's difficult to wade through exposure's technical aspects. Yet you need to understand them. Being comfortable with the technical side of exposure allows you to apply its aesthetic side, leading to an appealing photo.
The exposure setting on many cameras is set by the dial with letters and icons. Get to know those letters and icons. Knowing that “A” or “Av” controls the amount of front-to-back sharpness+ in your photo allows you greater creative options. The “S” or “Tv” letters control the shutter’s duration to freeze fast motion or allow motion to blur using a slower shutter. “M” requires attention to both shutter and aperture settings, but controls each creative decision.
Camera manufacturers' attempts at making cameras more accessible have actually made them harder to use. Learn the tripod of exposure–shutter, aperture, and ISO in place of the laundry list of new-fangled presets.
Shooting hand-held in low light levels, you need to decide how much ISO is needed before someone calls the pixel police. Just because your camera says it can shoot at high ISO numbers doesn’t mean you should use them. Newer cameras and larger sensors (Micro 4/3 sensors and larger) handle ISO noise better than the rest.

Most photographers set their cameras to “Auto White Balance” and never change it. This can compromise color fidelity in the name of convenience. Set your white balance to custom or a preset for better consistency.
The file format setting found under the Camera icon in the camera’s menu typically allows you to select between Raw and jpeg formatsD. Raw gives you the best quality and the most flexibility in post-production; jpeg gives you good quality and email convenience in a much smaller file size.
Step 6: “Moment”
The “moment," is when you press the shutter. It's when the camera captures darting photons to become a permanently static image. . Carefully consider this moment by asking why am I pressing the shutter, now? What makes this moment better than the previous one? Look for a confluence of frame + elements + light + moment. This decisive moment doesn’t last forever. Be prepared for when it comes.
Step 7: “Consider”
The moment has past. Photons have been captured forming a permanent image. This now stands as an archive of your effort. Be your own critic. You need to step outside of yourself to try to see the image from someone else's eyes (making this perhaps the most difficult step).
Consider the previous steps. Did you capture the feeling of being there? Do any of the elements in the frame distract the eye unnecessarily from your intended subject? Does the composition complement the elements and subject in the frame. Can you look at your photo with the fresh eyes of a new viewer and still be amazed, amused, and informed?
You may not have a perfect photoe. Do some self-evaluation. Could Photoshop save it, bring it back to life? Is it even worth saving? Do I need twelve photos of essentially the same moment?
The “consider” step is most powerful when you ask “Is this the story I want to tell?”
For the better part of three decades, Roger Tuttle has photographed life, for pay and for passion. Along with his varied photo projects, Roger splits time teaching Photography at the University of Utah and Utah Valley University.
His primary shooter is a Vivitar 600 (not really).
